- Home
- Skincare Guide
- Exfoliation Guide
- Home Dermaplaning
At-Home Dermaplaning Tips
Can you dermaplane at home? Yes, as long as you do it safely.
I'll explain how home dermaplaning works to give you smoother, younger-looking skin.
I tried at-home dermaplaning for the first time the other day. I was so impressed with the results I decided to share what this wonderful anti-aging exfoliating treatment is, how it works, and tips for at-home use.
But, first, let's start with the basics...
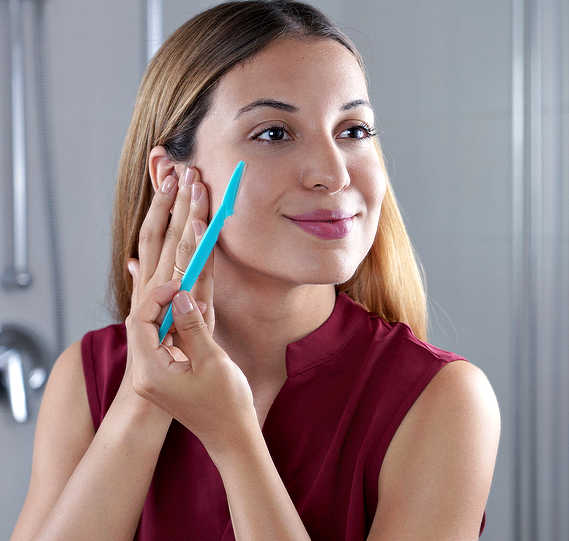
What is dermaplaning
Dermaplaning (also called dermablading) is a minimally invasive, in-office anti-aging treatment.
A licensed aesthetician or healthcare professional uses a very sharp surgical blade to shave away the very top layers of your skin, removing oil, dirt, dead skin cells, and fine hair (peach fuzz.)
The results are younger looking, softer, smoother, clearer skin. It also helps reduce the appearance of wrinkles and scars.
How is home dermaplaning different from in-office treatment
Professional dermaplaning:
Professional dermaplaning is a deep exfoliating facial treatment performed by trained skincare professionals in a clinic or spa. They use a specialized surgical blade to gently remove the top layer of skin, including dead cells and fine hairs.
This treatment can be tailored to address specific concerns, like acne scars or discoloration. It is considered safe and has fewer side effects due to strict hygiene standards.
At-home dermaplaning:
At-home dermaplaning lets you take control using personal skin shavers, also known as face shavers. However, it’s essential to keep both your face and tools clean to avoid accidental cuts.
This gentler method doesn't exfoliate as deeply as professional treatments.
Curious about the pros and cons of in-office versus DIY dermaplaning? Check out this comprehensive guide.
Dermaplaning vs shaving

Dermaplaning is similar to shaving your face, but the dermablade tool differs from a regular razor, which is designed only for hair removal.
The single blade of a dermaplaning tool is specifically made to exfoliate and cleanse the skin while removing excess hair. The thin, long, and small blades allow you to easily reach areas around the lips, mouth, and nose.
Who benefits from dermaplaning?
Most women could benefit from a monthly dermaplaning treatment. Especially, if you have:
- fine lines
- wrinkles
- dry, dull, flaky skin
- congested skin
- aging skin
More about safety issues below…
Benefits of Dermaplaning at home
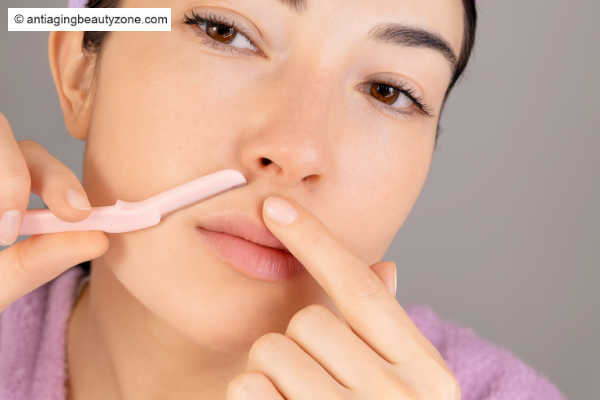
Cost:
The biggest advantage of at-home dermaplaning is the cost.
An in-office session at a medical spa can range from $100 to $250 per visit. In contrast, a high-quality carbon or stainless steel dermablade for home use costs under $20, often including several replacement blades.
For example, the one I use comes with three refill blades, and each blade can be reused about three times. So, if you dermaplane three times a month, you can enjoy three months of treatments for under $20.
Exfoliation and facial hair removal in one step:
Unlike a chemical peel, at-home dermaplaning offers deep exfoliation along with facial hair removal, even fine vellus hairs (peach fuzz). If you're over a certain age, you're probably dealing with pesky facial hair. Well, this tool takes care of that!
Brighter complexion:
This sharp tool eliminates a layer of dead cells off the surface of your skin, leaving you with even-toned skin that looks revitalized and glowing.
Better product absorption:
Between dead skin cells, facial hair, dirt, and oil, your expensive anti-aging skincare products won't be absorbed as easily, which is wasting money.
By eliminating that "junk" from the uppermost layer of the skin's surface can allow your skincare products to penetrate deeper and work better.
Healthier skin barrier:
The stratum corneum is the outermost layer of your skin. This barrier helps prevent environmental toxins from penetrate the skin and helps keep the skin healthy.
The over-use of chemical peels, scrubs, harsh cleansers, even alcohol and fragrances (found in many drugstore skincare products) can damage this barrier.
Adding a dermaplaning treatment to your skincare routine is an effective way to deeply exfoliate while taking a break from harsh scrubs and chemical peels.
Better makeup application:
Dermaplaning leaves skin smoother and pores seem smaller since it gets rid of facial hair and peach fuzz. This creates the perfect foundation for even makeup application, allowing powder and liquid cosmetics to rest on top flawlessly.
Is it safe to do dermaplaning at home?
Dermaplaning is generally safe for most skin types. However, some individuals may experience slight irritation in sensitive areas after treatment, depending on the dermablade used.
First-time users should avoid very sharp blades, as there may be a learning curve to using them correctly. Sharp blades can also increase the risk of nicks or cuts. If you do get a cut that becomes infected or if you experience significant redness or discomfort, contact your dermatologist. Fortunately, this is uncommon with commercially available at-home dermablades.
For the best results, always test a small area before proceeding with your entire face.
Who should not Dermaplane?
Dermaplaning should be avoided if you have:
- Active acne
- Used Accutane or tretinoin in the last six months
- Outbreaks of cold sores
- Eczema
- Moles, skin tags, and other skin growths
- Psoriasis
- Skin burns caused by radiation therapy, for example
- Rashes on the skin (contact dermatitis)
Will dermaplaning make hair thicker
No, dermaplaning will not make your hair grow back faster or thicker. Shaving or skin scraping does not alter the structure of the hair follicle—this is an old myth.
Your facial hair will grow back at the same rate and texture as before. Sometimes, it may feel thicker initially because shaving cuts the hair at its base, which can be coarser. You might notice this sensation in the first few days, but it typically goes away within a day or two.
How to prep your skin before dermaplaning
Before diving into the specifics of dermaplaning, let's cover some essential preparation steps for your skin.
To ensure your skin is ready, follow these measures:
- Check Your Face: Ensure you have no active skin conditions, like acne, eczema, or cold sores.
- Cleanse Your Skin: Use a gentle, pH-balanced cleanser to remove all makeup and cleanse your face.
- Facial Steam or Warm Compress (Optional): If you have stubborn blackheads or want to open your pores, use a warm, damp washcloth or facial steamer for a few minutes before cleansing.
- Pat Dry: Make sure your face is dry, as experts say this offers the best results. If you have very sensitive skin, a small amount of face oil or aloe vera can help protect against irritation.
- Clean Hands: Wash your hands thoroughly to prevent transferring dirt or bacteria to your face.
- Sanitize Your Tools: Disinfect your dermaplaning tool by soaking it in alcohol for a few minutes and letting it air dry to prevent infection.
- Have Good Lighting: Ensure you’re in a well-lit area, preferably with natural light, so you can see clearly.
- Test on a Small Area (Optional): If it’s your first time, consider testing a small, inconspicuous area to check for adverse reactions.
- Relax and Be Patient: Dermaplaning requires a steady hand, so take your time and don’t rush through the process.
By following these steps, you'll create the ideal conditions for a successful and safe at-home dermaplaning experience.
At-home dermaplaning: Step by Step Guide
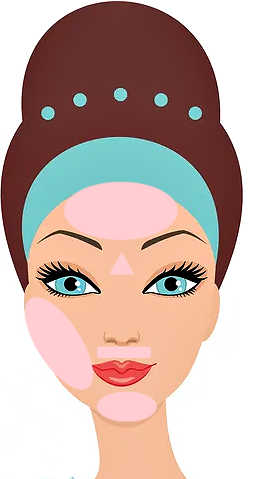 The pink highlighted areas on this face map suggest where you can use the dermaplane tool.
How to prepare for Dermaplaning
Before you start dermaplaning, follow these essential steps to ensure your skin is ready:
- Check Your Face: Ensure no active skin conditions, such as acne or eczema, are present.
- Cleanse Your Skin: Use a gentle, pH-balanced cleanser to remove makeup and cleanse your face thoroughly.
- Facial Steam or Warm Compress (Optional): If you have stubborn blackheads or want to open your pores, use a warm, damp washcloth or facial steamer for a few minutes before cleansing.
- Pat Dry: Ensure your face is dry, as this offers the best results. If your skin is very sensitive, apply a small amount of face oil or aloe vera to protect against irritation.
- Clean Hands: Wash your hands thoroughly to avoid transferring dirt or bacteria to your face.
- Sanitize Your Tools: Disinfect your dermaplaning tool by soaking it in alcohol for a few minutes and letting it air dry to prevent infection.
- Have Good Lighting: Ensure you’re in a well-lit area, preferably with natural light, to see clearly.
- Relax and Be Patient: Take your time with the process to ensure a steady hand.
By following these steps, you’ll create the ideal conditions for a successful and safe at-home dermaplaning experience.
Check out this helpful video by Schick Hydro Silk Dermaplaning wand:
I use the Schick Hydro Silk Dermaplaning Wand from Amazon.
How often to do dermaplaning?
How often you should Dermaplane your face at home?
Some dermatologists suggest that you should dermaplane your face about once or twice a month because your skin typically needs 1-2 weeks to heal and regenerate.
I think this suggestion is for a professional dermaplaning procedure because they use a surgical scalpel blade for a more intense treatment.
But home dermaplaning blades are not that sharp, so I find 3-4 times a month works well for me. It's best to find what works best for you, as everyone is different.
Dermaplaning after care tips
 Always use sunscreen after dermaplaning treatment.
What should you NOT do after dermaplaning
- Avoid Harsh Products: Stay away from exfoliating particles, strong acids (like glycolic and lactic acids), and active ingredients such as retinoids for several days to prevent skin irritation.
- Skip Abrasive Materials: Refrain from using washcloths or facial brushes for at least 24 hours. Instead, gently massage your face with your fingers.
- Use Lukewarm Water: Hot water can strip natural oils and cause dryness or redness. Stick to lukewarm or cool water.
- Skip Makeup: For optimal recovery, avoid makeup for the first day. I prefer to dermaplane in the evening, but there may be exceptions.
- Don’t Touch Your Face: Avoid touching or picking at your face for a few hours to reduce the risk of irritation and bacterial infection from minor cuts.
- Limit Sun Exposure: Stay out of the sun for at least a day or two to protect your skin.
- Avoid Swimming: Stay away from pools and the ocean for at least 24 hours, as chlorine and saltwater can irritate your skin.
Note: I prefer to dermaplane at night, giving my skin the chance to relax and soak in a nourishing oil or moisturizer. This way, my skin can fully benefit from the hydration and repair during the overnight hours.. 😊
What to Put on Your Face After Dermaplaning
Here's a simple breakdown of dermaplaning aftercare:
Hydrate: Immediately after, rinse your face with cool water. Then, while your skin is still damp, apply a good hydrating serum, face oils, or moisturizer. This helps restore moisture and keeps your skin feeling smooth. If your face feels dry, consider slugging overnight to restore moisture.
Gentle Cleansers: For a few days after, use a gentle, non-abrasive cleanser to wash your face.
Sunscreen: Sun protection is always important. But, several days after a dermaplaning treatment, your skin is even more vulnerable to UV damage. So, it's very critical to a sunscreen with at least SPF 30 if you're heading outdoors.
Note: If you want to use anti-aging serums, like vitamin C, read this section first.
Final thought: Is at-home dermaplaning effective?
After my first dermaplaning session, I was shocked by how my skin glowed—especially in spots where I used to apply highlighter, like above my eyebrows and the upper corners of my cheeks.
I've been using scrubs, chemical peels, and microdermabrasion machines for over 20 years, but I’ve never experienced such smooth skin. It truly radiated after applying moisturizer.
Initially, I thought using the dermaplaning tool on dry skin yielded better results. However, after a few treatments, I developed lightly irritated patches. Now, I apply a face oil before dermaplaning, which works perfectly without irritation.
FAQ's: At Home Dermaplaning
Q: What should I put on my face before dermaplaning it?
Q: What should I put on my face before dermaplaning it?
A: That depends on your skin type. Some people with dry skin like to apply a thin layer of face oil. But, personally, I like to dermaplane on dry, clean skin.
Q: Which is better Dermaplaning vs microdermabrasion?
Q: Which is better Dermaplaning vs microdermabrasion?
A: Both are great for your skin. However, they each offer different benefits. Microdermabrasion is great if you have discoloration, brown spots or clogged pores. You can read about the difference between dermaplaning and microdermabrasion here...
Q: How often should I Dermaplane at home?
Q: How often should I Dermaplane at home?
A: You can dermaplane 1-4 times a month, depending on your skin type. I usually do about 2 times a month.
Q: Should you Dermaplane at home wet or dry?
Q: Should you Dermaplane at home wet or dry?
A: Dry dermaplaning gives better results. But if you have dry or very sensitive skin, you should apply a light layer of face oil.
Q: What to put on skin after home dermaplaning?
Q: What to put on skin after home dermaplaning?
A: A good super hydrating moisturizer is best. Also, consider applying a serum that contains vitamin C for even more anti-aging benefits.
Q: Why is my face itching after dermaplaning?
Q: Why is my face itching after dermaplaning?
A: Dermplaning can cause irritation or itching for some people. This is especially true if you go too hard or run the blade over the same area too many times. Always use a gentle touch and don't go over the same area more than once.
Q: Is it normal to get bumps on my face afterwards?
Q: Is it normal to get bumps on my face afterwards?
A: Yes, it's happened to me a few times too. It often happens when you go against the way your hair grows on your face. To avoid this in the future, always move the blade in the same direction as your facial hair grows.
Q: Is it best to dermaplane before or after a shower?
Q: Is it best to dermaplane before or after a shower?
A: It doesn't really matter, as long as your face is super clean before this treatment. Some people find doing this on dry skin is more effective and helps remove dead cells and hair better.
However, it can also cause more irritation. If it does, applying oil can help cut the chances of irritation.
Q: Difference between dermablading vs dermaplaning?
Q: Difference between dermablading vs dermaplaning?
A: They're the same thing.
Want More?
I share quick routines, beauty tweaks, and what’s working for me — straight to your inbox. Join the Club and get this free Cheek Shaper Video.
About the Author:
Linda Robison is a Facial Fitness Specialist and the founder of Anti-Aging Beauty Zone. With decades of hands-on experience, she shares practical, natural ways to lift and brighten mature skin—without expensive or invasive treatments.
Before you go ....
Please tap on the💙in the bottom right corner if you found this page helpful.
FOLLOW ME FOR MORE TIPS:
SHARE OR SAVE FOR LATER:


