- Home
- Skincare Guide
- Homemade Skincare
- Enzyme Recipes
Enzyme Face Mask Recipes For Glowing Skin

I love making homemade face masks. I've tried all kinds of exfoliating treatments over the years, and one thing I've noticed is that they don't all leave my skin looking quite the same.
Some leave my face looking a little firmer, some make it feel smoother, and some seem to give my skin more of a glow.
That's one reason I like throwing a homemade mask into my beauty routine once in a while. They're fun to make, I can choose ingredients based on what I feel my skin needs at the time, and they're natural and inexpensive too.
Fruit-based enzyme masks are one option I enjoy. They can help loosen dull surface skin cells, which may leave your skin feeling softer and looking brighter.
Here are a few simple recipes you can try at home. And if you enjoy making your own skincare treatments, you'll find more ideas in my DIY scrubs and masks.
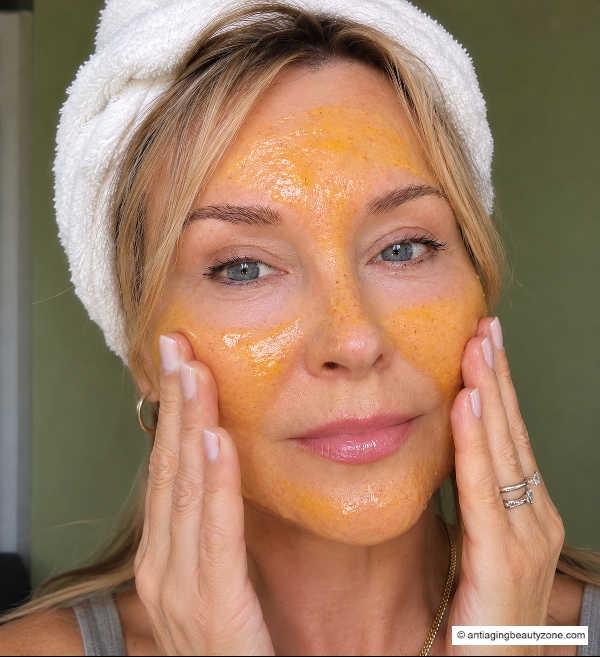
What are enzymes in skincare?

Did you know that fruits like papaya and pineapple contain natural enzymes that can help loosen dead skin cells?
What I like about enzyme masks is that they exfoliate without having to scrub your face. And depending on the ingredients, they may be gentler than some acid peels.
Of course, natural doesn't always mean gentle. Even homemade fruit masks can irritate your skin, so it's worth paying attention to how your skin reacts.
And, if you're curious about other ways to exfoliate, see how I like to use lactic and glycolic acid peels together.
Benefits of Homemade Enzyme Masks
So what can you expect from a homemade enzyme face mask?
It really depends on the fruit you're using and how your skin responds. But here are a few reasons I enjoy them:
- Smoother-feeling skin: Fruit enzymes may help loosen some of those dull surface skin cells.
- A fresher-looking complexion: After rinsing off a mask, your skin may look a little brighter.
- A little extra moisture: Ingredients like honey and yogurt can help leave your skin feeling softer.
Just keep in mind that homemade masks aren't as predictable as professionally formulated enzyme treatments.
DIY enzyme mask recipes at home

Here are some recipes you can try at home. These basic recipes have worked for me, but feel free to tweak them to suit your complexion and sensitivity.
1. Pineapple
Why it works: Pineapple contains bromelain, an enzyme that helps break down proteins and may help loosen dead surface skin cells.
Fresh pineapple can be pretty strong on the skin, though, so I wouldn't leave this homemade mask on for long.
Ingredients:
- ¼ cup fresh pineapple, puréed
- 1 tablespoon coconut milk
- 1 teaspoon honey
Directions:
Mix everything together until smooth. Apply a thin layer to clean skin, avoiding your eyes and lips. Start with just 2–3 minutes, then rinse thoroughly with cool water and follow with moisturizer.
Tip: Patch test first. If you notice burning, stinging, or redness, rinse it off right away. Don't use it on irritated or broken skin.
2. Pumpkin

Why it works: Pumpkin purée makes a nice base for a homemade mask, and the honey helps leave skin feeling soft. Just don't expect the same exfoliating results you'd get from a store-bought pumpkin enzyme peel.
Ingredients:
- 2 tablespoons plain pumpkin purée
- 1 teaspoon honey
Directions:
Mix everything together until smooth. Apply a thin layer to clean skin, avoiding your eyes and lips.
Leave on for about 5 minutes the first time, then rinse with lukewarm water and moisturize.
Tip: Use plain pumpkin purée, not pumpkin pie filling. Patch test first, and rinse it off if your skin starts to sting or burn.
3. Papaya

Why it works: Papaya contains papain, an enzyme that may help loosen dead skin cells. It's a good fruit to try if you enjoy making homemade enzyme masks.
Papaya Enzyme Mask at Home
- 2 tbsp ripe papaya, mashed
- 1 tsp honey
- 1 tsp plain yogurt (optional)
Steps: Mix everything together. Apply a thin layer to clean skin, avoiding your eyes and lips. Leave on for about 5 minutes the first time, then rinse and moisturize.
Tip: Patch test first, and rinse immediately if your skin starts to sting or burn.
Want more ideas? See my gentle exfoliation tips.
4. Peaches
Why it works: Peaches contain natural fruit acids, while the yogurt and honey can help leave your skin feeling softer. It's a nice combination for a homemade face mask.
- ¼ cup mashed ripe peach
- 1 tablespoon plain Greek yogurt
- 1 teaspoon honey
Steps: Mix everything together and apply a thin layer to clean skin, avoiding your eyes and lips. Leave on for 5 minutes the first time, then rinse and moisturize.
Tip: Patch test first, especially if your skin is sensitive. Rinse it off if you notice any stinging or irritation.
5. Cocoa powder & papaya
Why it works: Cocoa powder contains antioxidants, while the papaya adds natural enzymes that may help loosen dead skin cells. The honey helps leave your skin feeling soft.
- 1 tablespoon unsweetened cocoa powder
- 1 tablespoon honey
- 1 teaspoon mashed ripe papaya
Steps: Mix everything together until smooth. Apply a thin layer to clean skin, avoiding your eyes and lips. Leave on for about 5 minutes the first time, then rinse well and moisturize.
Tip: Use plain, unsweetened cocoa powder, not hot chocolate mix. Patch test first and rinse if your skin starts to sting or burn.
6. Berries (bonus mask)

Note: This isn't really an enzyme exfoliating mask, but I love using blueberries because they're packed with antioxidants.
My husband and I make protein shakes with frozen blueberries, and we always seem to have a half-used bag left in the freezer. So why not use some of those leftover berries to make a face mask? Just thaw them first!
Why it works: Blueberries are rich in antioxidants, and the honey adds a little moisture to help leave your skin feeling soft and hydrated.
Antioxidant Face Mask (Homemade Blueberry)
- ¼ cup mashed blueberries (fresh or thawed)
- 1 tbsp honey
Steps: Mix together and apply a thin layer to clean skin, avoiding your eyes and lips. Leave on for about 10 minutes, then rinse well and moisturize.
Tip: Blueberries can stain, so be careful around clothing and towels. Patch test first.
Mask tips
A few things to keep in mind when making and using homemade fruit masks:
- Patch test new ingredients before applying them to your face.
- Apply to clean skin, avoiding your eyes and lips.
- Spread the mask gently. There's no need to scrub.
- Don't leave it on longer than recommended, and rinse it off right away if your skin starts to sting or burn.
- Follow with a moisturizer.
- Keep a towel handy to protect your clothes from drips and stains.
For more tips, see my facial mask dos and don'ts and different types of facial masks.
Storage: Make these masks fresh and use them right away. Don't save leftovers for another day.
Ingredient recommendations
I prefer using fresh fruit when making homemade face masks. But frozen fruit that's been thawed can work too.
For enzyme masks, I'd avoid canned fruit that's been heated during processing, since heat can reduce the activity of certain fruit enzymes.
And if you're using cocoa powder, stick with plain, unsweetened cocoa rather than hot chocolate mix.
FAQ
Can I use an enzyme mask with retinol or exfoliating acids?
Can I use an enzyme mask with retinol or exfoliating acids?
I'd avoid using them in the same session. Combining exfoliating treatments can leave your skin irritated, especially if you're using stronger products. Give your skin a break between treatments and pay attention to how it responds.
Can homemade enzyme masks help with dark spots?
Can homemade enzyme masks help with dark spots?
Exfoliation may help dull skin look a little brighter, but I wouldn't count on homemade fruit masks to fade stubborn dark spots.
If uneven skin tone is something you're dealing with, see my skin brightening tips for other options.
Takeaway
I enjoy making homemade masks, but I don't use them all the time.
Since I already use lactic and glycolic acid peels about once a month, I usually make one of these fruit masks about four times a year, often when the seasons change.
For me, it's just a fun, inexpensive way to mix things up and give my skin a little extra attention.
And don't forget sunscreen! Protecting your skin from the sun is important every day, especially when exfoliation is part of your routine.
What to try next
If you enjoy making your own skincare treatments, here are a few more ideas:
- DIY scrubs and masks — More homemade skincare recipes to explore.
- Sugar face scrub recipes — If you enjoy using a traditional face scrub.
- Pearl powder face mask — Another homemade mask option.
And if you're curious about the chemical peels I mentioned, here's my experience with lactic and glycolic acid peels.
Have a question or want to share your experience?

I'd love to hear from you! Visit my Questions & Comments page to ask a question, share a tip, or tell me what's worked for you.
Want to Stay in Touch?
Get my latest beauty tips, products I'm trying, little tricks I've discovered, and a few personal updates, too.
I'd love to keep you in the loop!

About the Author:
Linda Robison is a Certified Facial Fitness Specialist and founder of Anti-Aging Beauty Zone, where she shares practical tips, products, techniques, and at-home options for women over 40. She personally tests many of the methods she writes about.
Experience: Linda spent nearly 15 years as an Anti-Aging Health Advisor at the Life Extension Foundation and has over 30 years of experience testing facial anti-aging techniques, including training in Carolyn’s Facial Fitness. Her work has been featured in GB News and Beauty Box Magazine. You can view her background on LinkedIn and follow her on Pinterest.
Found this helpful? Tap the ♡ in the bottom right corner.
FOLLOW OR SAVE

Stay Connected with Me
Want to see what I’m up to? I’ll keep you posted on new products I’m trying, little tricks I’ve discovered, new finds, and a few personal updates too.
Affiliate disclosure: As an Amazon Associate and affiliate for other brands, I may earn a commission from qualifying purchases, at no extra cost to you. [Read Disclosure.] A quick note: I create the content on this site and sometimes use AI tools for writing and images. I review everything for accuracy, and my before-and-after photos are my own.
Anti-Aging Beauty Zone (ABZ): Small Changes, Big Results!
ALL CONTENT COPYRIGHT© 2013-
ALL RIGHTS RESERVED REGARDLESS OF LINKS OR ATTRIBUTIONS
ALL CONTENT COPYRIGHT© 2013-
ALL RIGHTS RESERVED
REGARDLESS OF LINKS OR ATTRIBUTIONS